Share Pola : Aneka Pola Bunga Rajut

Happy sunday semua....
Sebelumnya Rajut Handmade sudah pernah Share pola Daisy Coaster Flower Crochet yaa...Kali ini Rajut Handmade mau share pola-pola bunga nih. Soalnya inget dulu waktu pertama belajar merajut pasti yang dicari dan dicoba yaitu pola bunga rajut. Oleh karena itu Rajut Handmade mau share aneka pola dan tutorial bunga rajut buat para rajuters sekalian.

Okk kita share dari pola yang paling sederhana ke pola yang rumit yaa...

1. Five Petal Flower

Five Petals Daisy


Pattern from : Flower Girls Cottage
Atau bisa download di Raverlry


Pattern:

10 Single Crochets into Magic Circle, Join with slip stitch

Petal Cluster: Working in the same joining slip stitch, Chain 3, work a 4x Crochet Stitch 3 times, chain 3, slip stitch all into the same stitch

Skip 1 Single Crochet

Slip Stitch and repeat the petal cluster 4 times, End last petal with slip stitch

Flower Center, Chain 15, Trim the ends of chain stitch string

Twirl the chain stitch string into a circle and use fabric glue or hot glue to place in the center of flower

Flower Center Alternatives: large button or leave plain

2. Bunga Rajut Tumpuk


Pattern from Mollie Makes
Row 1: ch 3
Round 2: 11 tr into 3rd ch from hook, join with sl st to top of beginning ch 3 (12 tr made)
Round 3: Join 2nd colour into top of any tr st from last round. *(ch 2, tr 1) into tr st, (tr 1, ch 2, sl st) into next tr st*. Rep from * to * 6 times.
Fasten off.
Round 4: With 3rd colour and working behind row 2, work 1 sl st into stitch (Hook 2 loops to create a stable base to work from) between petals, (ch 4, 1 sl st in stitch between next petal) 5 times. ch 4, sl st to 1st sl st to close.
(6 x 4 ch loop spaces made)
Round 5: sl st into 1st ch space. (2 ch, 3 tr, 2 ch ) over each 4 ch loop space. Cut yarn and fasten off.
Round 6: With 4th colour and working behind round 4, work 1 sl st into stitch between petals, (ch 5, 1 sl st in stitch between petals) 5 times, ch 5, sl st to 1st sl st to close. (6 x 5 ch loop spaces made)
Round 7: sl st into 1st chain space. (2 ch, 4 tr, 2 ch ) over each 5 ch loop. Break yarn and weave in all ends.

Atau bisa juga liat pola diagram dibawah ini
Lace Flower  ☀CQ #crochet #crafts #DIY.  Thank you for sharing! ¯\_(ツ)_/¯

3. Crochet Rose 

Pola dasar mawar yang paling sederhana
Pattern from : RajutMerajut
Mulai dengan CH 57
Baris 1 : (dc, ch 2, dc) di ch ke enam dari jarum hakken (sk 5 dari jarum hakken), *ch 2, sk 2 ch, (dc, ch 2, dc)*, ulangi langkah * ke *, total 36 sps. Balik.
Baris 2 : ch 3, 5 dc di sp pertama, *sc 1, sk 1 sp, dc 6* ulangi langkah * ke * sebanyak 5 kali. (sc 1, sk 1 sp, dc 9) ulangi 5 kali, (sc 1, sk 1 sp, dc 12) sebanyak 7 kali. Total 18 sps terisi dc, 18 sp yang di sk. Matikan benang.
Untuk hasil akhir, setelah benang dimatikan, bagian pola dapat dijahit untuk menyatukan kelopak demi kelopak kemudian dipasang dengan menggunakan peniti. Silahkan berkreasi untuk penyelesaian akhirnya.

Ada juga tutorial bentuk gambar untuk pola mawar rajut ini. Hampir sama namun pada baris ke-3 diisi 2dc-2ch-2dc tiap ch space. Kemudian untuk kelopak diisi sama rata tiap space nya 6dc dan sc di antara ch space nya. Liat gambar agar lebih jelas
Rosette - no pattern, but photos give the general concept  #crochet #flower #embellishment
Dan ada lagi tutorial untuk mawar ini, dengan pola dasar yang sama tapi kelopaknya kombinasi dengan crochodile stich
crochet rose ✭Teresa Restegui http://www.pinterest.com/teretegui/ ✭

 4. Blue Flower

Crocheted motifs..lovely...don't know how to read the pattern but give me time!!!


5. Irish Flower White

  Irish Crochet Flower (chart + tutorial)

6. Bunga Tumpuk Unik


Yaps.. itu beberapa pola bunga yang Rajut Handmade share... Pola dasarnya sebernernya sama, tetapi dengan kreatifitas bisa menciptakan pola baru yang lain dari yang lain.
Masih banyak pola yang ingin di share, mungkin dilain waktu akan share pola bunga yang 3D.
Sekian share pola kali ini, semoga tulisan ini bermanfaat.
Selamat berkarya.

Hasil gambar untuk 100 flower t0 crochet and knitDownload Ebook 100 Flower to Crochet and Knit

Read more »

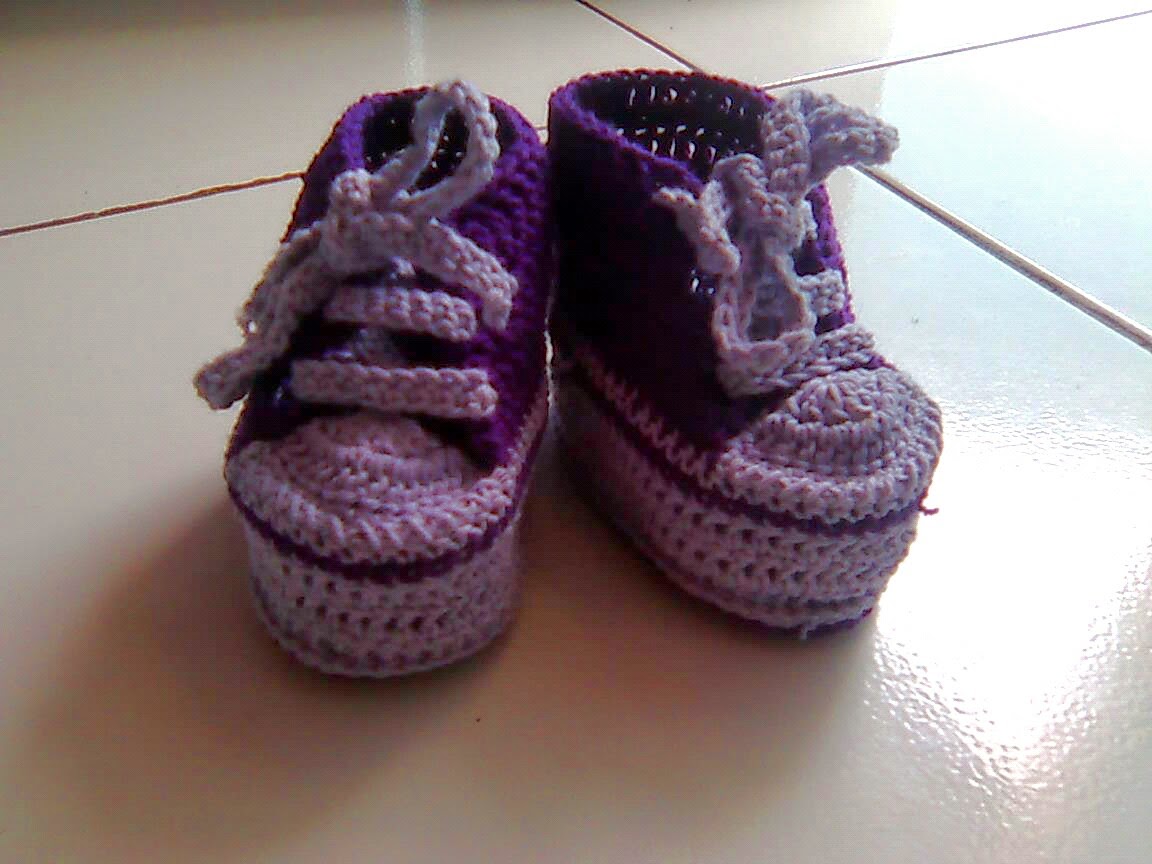
Share Karyaku : Baby Converse Crochet

Pagi semua... Proyek rajut apa yang dikerjakan weekend ini??
Rajut Handmade udah lama pengen share sepatu baby ini... walaupun udah banyak yang nulis di blog tentang pola ini...

Baby Converse Crochet


Polanya termasuk gampang dan mudah dibuat. Walaupun hasilnya gak mirip sama yang ditiru.
Maklum masih belajar...
Polanya dapet dari blog luar yang pake bahasa [ga tau] dan untungnya ada pola bahasa inggris yang lebih mudah dimengerti..
Cek blognya di sini

Okk, buat yang gak mau repot klik blognya
Saya copaskan pola dan tutorialnya di sini

Stitches used:
chain (ch)
double crochet (dc)
single crochet (sc)
slip stitch (sl st / ss)
half double crochet (hdc)

Note: when said to “make 2 dc tog” it means “make them together in the same stitch”


*Pola sol sepatu* :

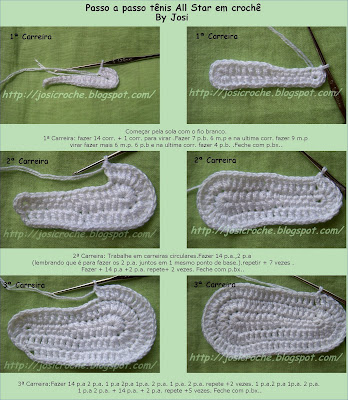
Start from the sole using white thread
1st row: 14 ch + 1 ch to turn. Then 7sc , 6hdc. In the last ch make 9hdc and turn. Go back on the other side of the ch, making 6hdc and 6 sc. In the last ch (where you made the first sc) make 4 sc. Fasten with sl st. Do not turn.
2nd row: work in circular rows. Ch3, 14 dc, *2dc tog, repeat from * 7 times; make 14 dc, 2dc tog, repeat * 2 times; sl st on ch3
3rd row: ch3, 14dc, (2dc tog, 1dc) 3 times; (2dc tog) 3 times; (1dc, 2dc tog) 3 times; 14 dc; (2dc) 6 times; sl st on ch3 (liat foto di bawah)

Tutorial Sol Sepatu

*Membuat sisi samping* :

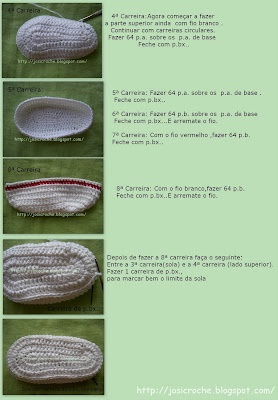
4th row: Still using white thread, start making the sides, still circular rows. Ch3 and 1 dc on each stitch. Fasten with sl st.
5th and 6th rows: repeat 4th row. Fasten off
7th row: Using red thread make 1sc on each dc. Fasten off with sl st.
8th row: Using white thread, make 1sc on each sc. Fasten off with sl st.
After the 8th row: between the 3rd row (sole) and the 4th row (side) make a row of sc on each stitch, to make the sole well defined. Fasten off (liat foto di bawah)
Tutorial sisi sepatu [1]

Sisi [2]:

I do this way for the 9th row, starting from here (arrow pints the red pin)
9th row: use pink thread. See the picture to understand better. Fold the work lengthways. Leave 7 gaps between the sc and start 25 dc with pink thread. Since it is also divided on the other side, you’ll have 14 gaps in front (where you’ll make dc in white at a later stage) and 50 for the sides in pink. From now on, turn the work at the end of each row.
(on the picture in the middle): You’ll do the 14 dc here for the front of the shoe.
10th row: work back 50 sc (liat foto di bawah)
Tutorial Sisi [2]

Sisi [3]: 

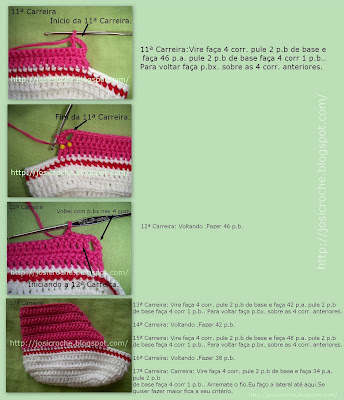
top picture: beginning of 11th row.
Second picture: end of 11th row
11th row: at the end of 10th row, tunr your work, ch4 skip 2 sc below and make 1dc on each sc (46); ch 4, skip 2 sc below, sc. Turn, making 1sl st in each ch
12th row: 46 sc
13th row: work as 11th row (you’ll have 42 dc)
14th row: work as 12th row
15th row: work as 11th row (you’ll have 38 dc). ATTENTION: If you’re comparing this translation against the original text, you’ll see that Josi calls for 48 stitches, but if you look at the final picture here you’ll see that the in each row there’s a decrease of 4 stitches in each side, so here you have 38 dc)
16th row: work as 12th row
17th row: work as 11th row (you’ll have 34 dc). Do not work the sl st. Fasten off. You can make a few more rows if you want. (liat foto di bawah)
Tutorial sisi [3]


*Membuat lidah Sepatu*

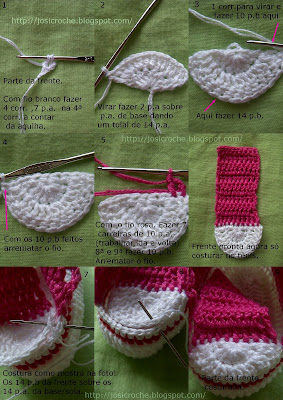
1 – Front. Using white thread, ch 4, then 7 dc in the 4th ch from the hook. Ch3 and turn
2 – 2 dc tog in each dc (14 in total). Ch 2 and turn
3 – 1 sc in each dc then ch 1 and do 10 sc on the base of you semi-circle (as shown by the top pink arrow)
4 – After the 10sc, fasten off
5 – Using the pink thread, make 10 dc on the 10 sc in white. Repeat to a total of 7 rows and then 2 rows of 10 sc. Fasten off
6 – The front (tongue) is ready, now it just needs to be sewn to the shoes.
7, 8 and 9 – How to sew your shoes (just the white part) (liat foto di bawah)
Tutorial membuat lidah sepatu

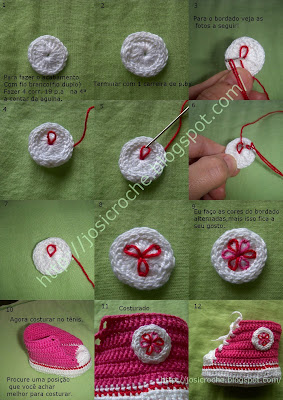
*Membuat Hiasan Bintang*

1 – Using white thread, ch 4 and make 19 dc on the 4th ch from the hook. Close with a sl st .
2 – Make 1 sc on each dc, close with a sl st and fasten off
3 to 9 – That’s how you make the “star”. You can use any colours you like.
10 – Sew it on the side, where you find it easier.
11 – Sewn.
Tutorial membuat bintang

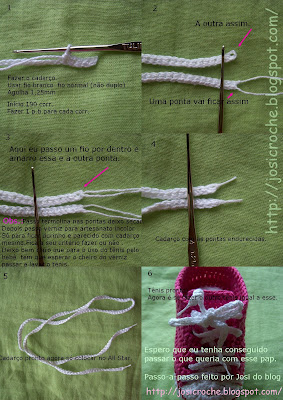
*Membuat Tali sepatu*

1 – Now the laces. Use white thread, single and 1.25 hook. Ch 190, ch1 turn and make 1 sc on each ch. Fasten off.
2 – One side has the turning chain and the other has the beginning and ending threads.
3 – Pass a small thread through the turning chain (pink arrow). Use varnish for crafts to make it stiff, like real laces. Remember to let it dry completely and wash the shoes before the first use!
4 to 6– Laces ready! Now just make the other one!
Tutorial Tali sepatu


Selain pola diatas ada lagi pola sejenis yang  bisa di download dalam bentuk file pdf yang udah Rajut Handmade simpan. Pernah nyobain polanya, lebih ribet, tapi lebih rapi hasilnya.Silahkan klik download untuk mengunduh polanya, dan membandingkan hasilnya.
Selamat berkarya.


Download Ebook Rajut Bayi [Klik]
Read more »

Download Gratis Pola Rajut Bayi

1. Let's Knit Series Ebook
for baby 0-24m

2. Sweet Baby Knit
Read more »

Download Gratis Pola Amigurumi Rajut

Free Download Amigurumi Crochet Pattern

1. Amigurumi In The Garden
by Gourment Crochet
 

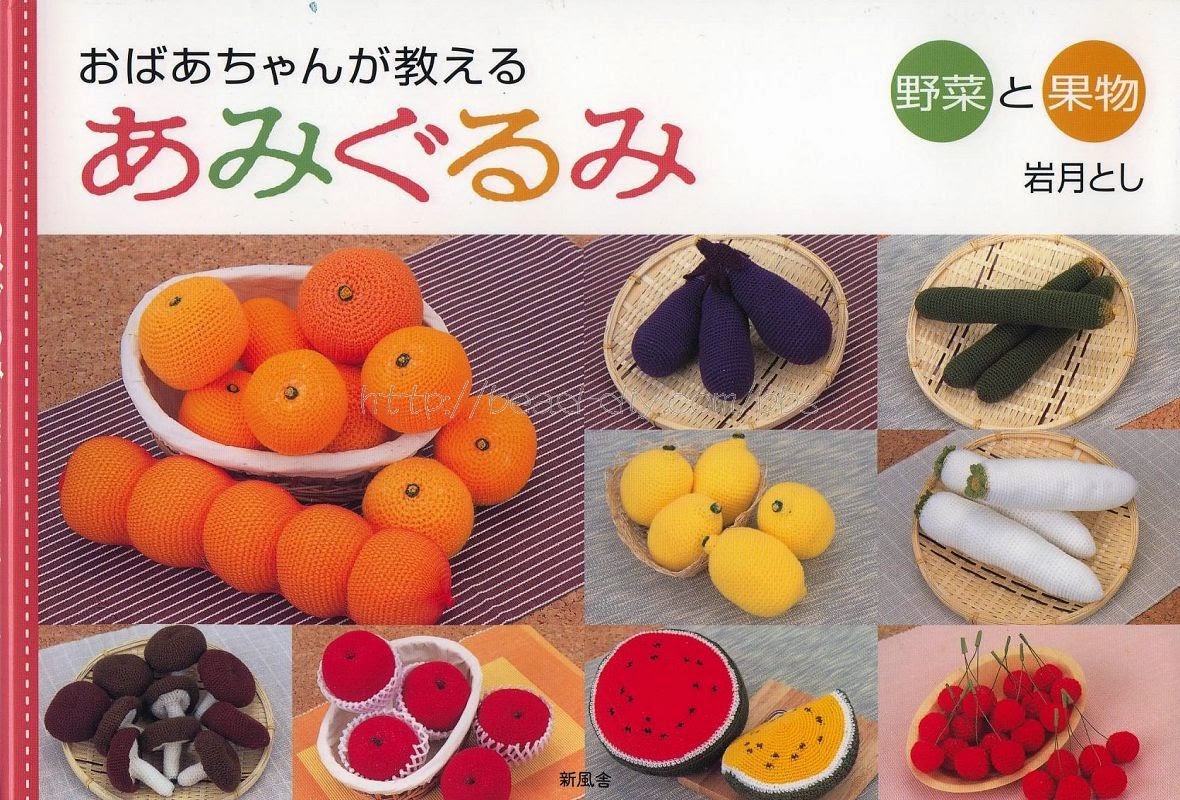
2. Amigurumi Buah

3. Amigurumi Sayuran
Read more »

Share Pola : Daisy Flower


Daisy Flower Crochet

Hasil karyaku sambil nunggu suami pulang kerja. hehehe... Manfaatin sisa benang yang ada sembari nunggu gajian turun buat beli stok benang yang baru. (Semoga tidak kalap beli nanti) hahahaha...

Nemu gambarnya di pinterest baru sempet nyobain polanya, ternyata gampang diikutin..
silahkan download polanya disini Daisy Coaster


Dan ada satu lagi pola daisy flower yang lain yang nemu di pinterest.
Si pembuat pola belum kasih nama buat polanya maka dari itu biar gambang kasih saja namanya
Sponbob Daisy Flower, soalnya bunganya mirip seperti yang ada di film kartun Sponsbob hehehe

Ini dia hasil karya ku


Polanya ada di bawah ini:


PATTERN

Rnd 1 -

With yellow:

Ch 2, 12 sc in 2nd ch from hook. Fasten off.

Rnd 2 -

With contrast color:

Join w/ sc in any sc
Ch 5, sc in next 4 ch
Ch 1, sl st in same st as first sc
Sc in next sc

* Sc in next sc
Ch 5, sc in next 4 ch
Ch 1, sl st in same st as last sc before ch-5
Sc in next sc

Repeat from * around, join with sl st to 1st sc.

Rnd 3 -

Sl st in next sc, ch 1

* Working in free loops,
[sc in first st, hdc in next st, dc in next st, 4 dc in next st]
Working in sc on the other side of petal,
[3 dc in next sc, dc in next sc, hdc in next sc, sc in next sc]
Ch 1, sl st in next 2 sc (between petals)
Ch 1

Repeat from * around, join with sl st to 1st sc.

Finish off.

Atau bisa kunjungi langsung situsnya di sini


Mau download ebook pola bunga klik di sini
Read more »

Download Gratis Pola Fashion Crochet

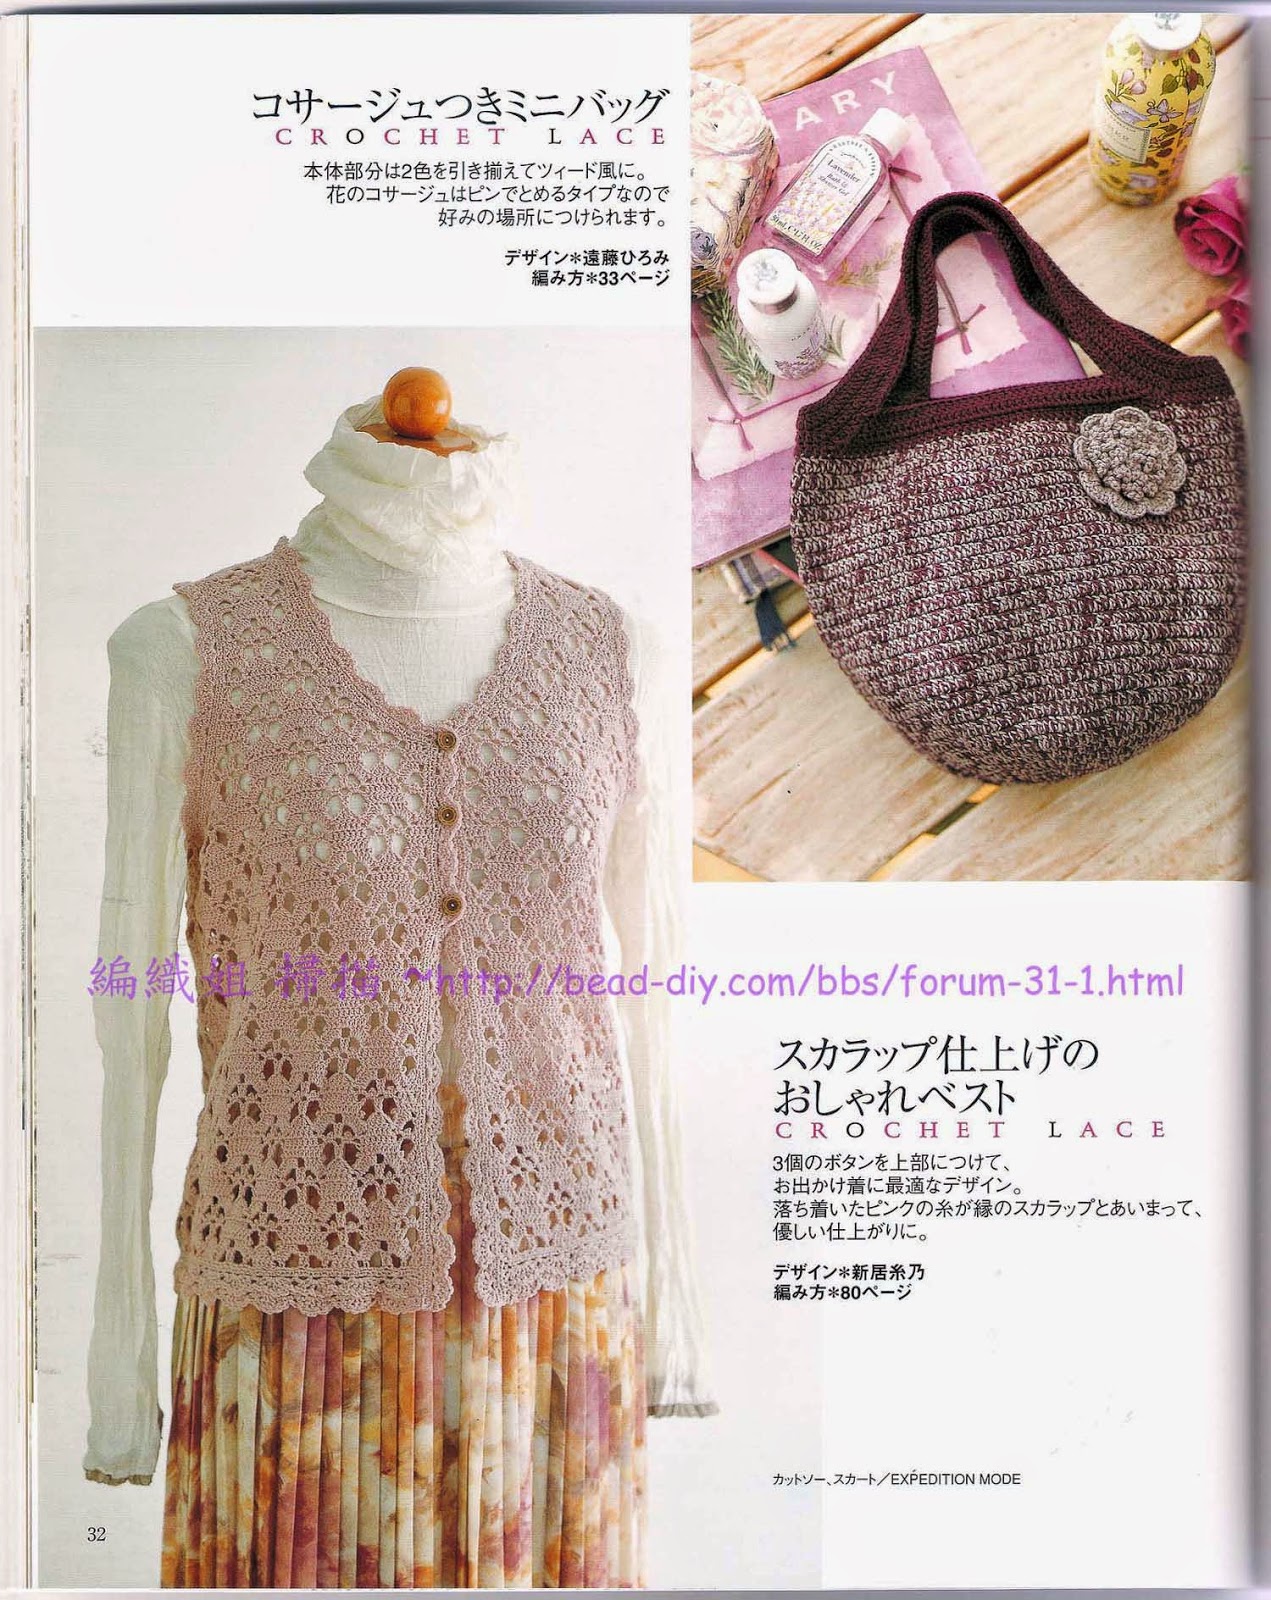
1. Vest Cream 

2. Vest Coklat
http://www.linkbucks.com/Bi1a6
Download


3.Vest Ungu
 Klik
Download


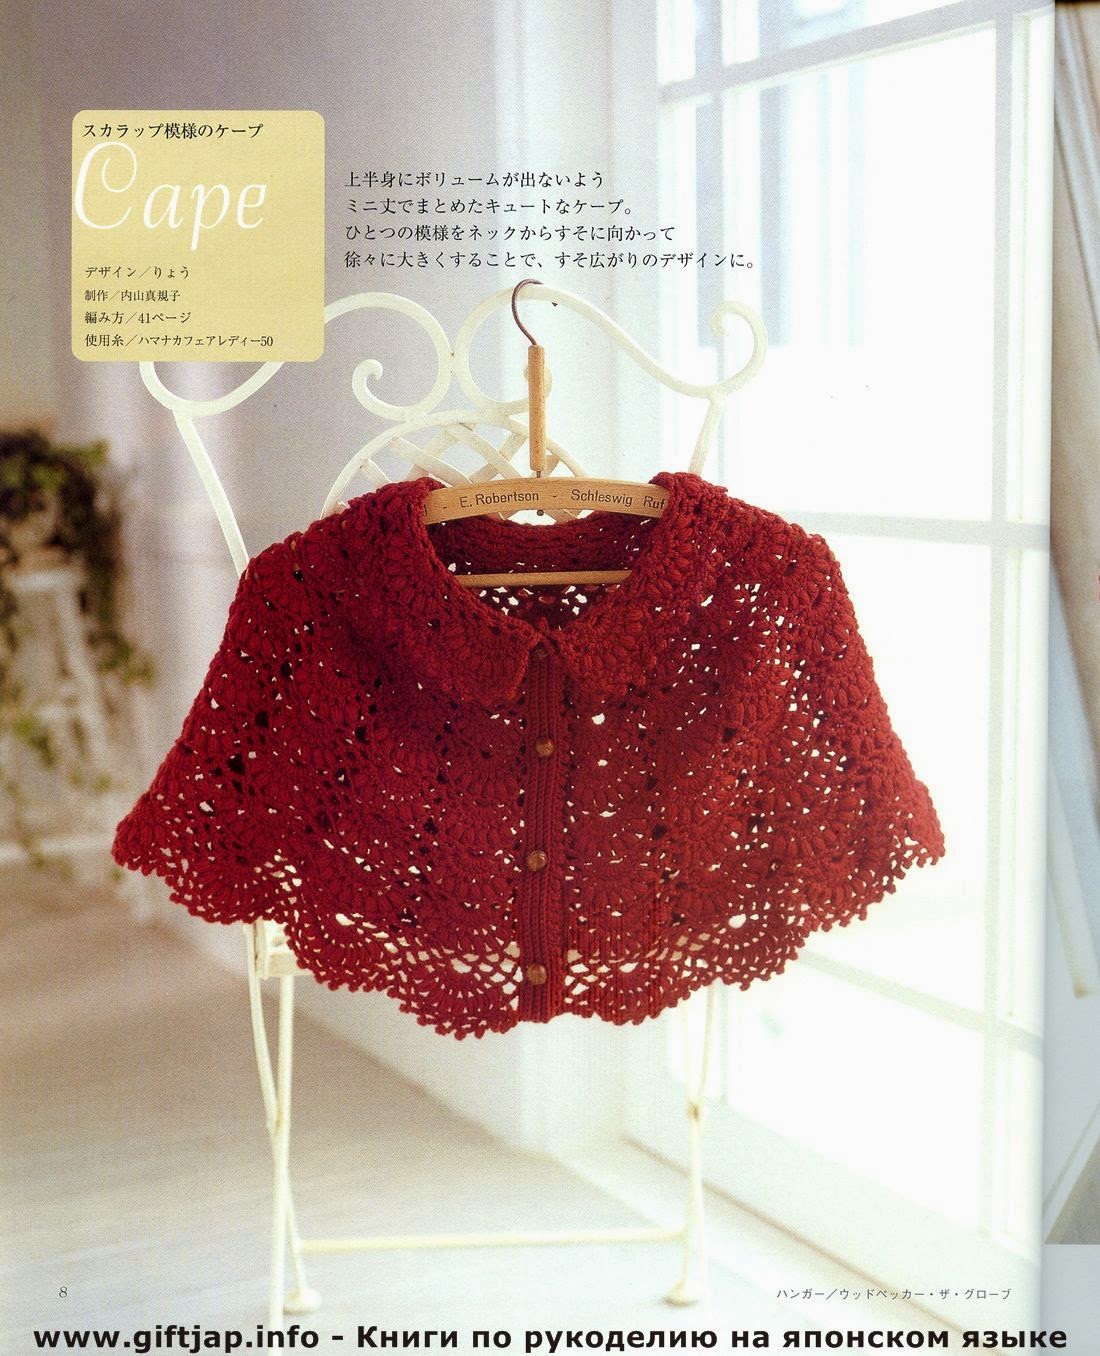
4. Red Cape
http://www.linkbucks.com/Bi1a6
Download


5. Elegan Cardigan
http://www.linkbucks.com/Bi1fG
Download


6. Filigree Cardigan
Download

7.  Ebook Ondori Crochet
 Download


Read more »

Spiral Handle Bag

Ceritanya bikin tas, trus niatnya pake handle yang kaya tali itu lhooo... mau beli tapi harus sekilo minimal, kan sayang sisanya dibuang... Ehh di group Belajar Merajut ada tutorial bikin Spiral Handle Bag pas banget ini pikirku...

Berikut penampakan hasil bikinan Arliy :D
Spiral Handle Bag

Pose Love :D

 Sayangnya pas bikin handle ke dua malah benangnya kurang... sesuatu banget dehh ahhh hikz...

Kurang Benang

Material yang dipake benang mabel big ply dari Benangrajut.com
Tutorialnya dari mba Iin Wibisono

Step by step nya

1. Buat 3 ch
2. Buat 6sc di ch ke 3 dari hook
3. Buat sc di sc berikutnya, masukkan hook di bagian luar sc
4. buar sc,selipkan di stich yang ada di gambar (susah dijelasin, liat videonya saja)
5. Kerjakan sc sampai panjang yang diinginkan

Lebih jelasnya silahkan liat video youtubenya saja


Sampai di sini dulu share karya dan tutorial dari saya.
Salam Rajut Handmade
Read more »

Deerfield Vest Pattern

Akhirnyaaa.... setelah rombak sana rombak sini akhirnya jadi juga vest ini.
Banyak cerita  sampe akhirnya jadi, dari gagal paham patternnya, kekecilan sampe akhirnya di rombak dan diperbesar ;-)
Yuhuuu....

Vest Rajut

Material : - Benang rayon 4 gulung
                 - Hook ukuran 3,5mm

Pattern   : Deerfield Vest


Foto diatas adalah vest ukuran L yang telah diperbesar. Bagian yang diperbesar adalah bagian belakang atau kalau di pattern yang bagian Back Pattern, dari 6 motif jadi 8 motif.
Panjang ke bawah juga dipajangin tapi asli nyesel udah manjangin sebelum disambung soalnya hasinya jadi gak fit body dan keliatan mbeleber hikz..hikz... :(
Tips buat yang pengen bikin lebih panjang, panjangin setelah disambung,atau kalo mau edgingnya bisa juga dipanjangin tapi pasti ngaruh ke edging yang depan sama leher.

Okk sedikit share gimana buat yang masih belajar baca pattern tulisan seperti saya (akhirnya gagal paham dan bongkar sana-sini hahaha) semoga tidak seperti saya.

Bagian pertama yang dibikin "Back Pattern" kemudian lanjut "Lace Pattern" sesuai ukuran yang diinginkan.
Kemudian bagian depan, foundation bagian depan disambung dengan foundation bagian belakang lanjut "lace pattern" sampai sama dengan bagian belakang.
Lanjut.. sambung bagian depan dengan belakang (liat pattern) kemudian lanjut lagi pattern lace sampe panjang yang diinginkan. Dan terakhir buat Edging. Jujur saya gagal paham di bagian edging ini apalagi pas di bagian depan sama leher, so jadilah seperti di foto tersebut.

Yapss.. inilah hasil rajutan saya yang masih acak adul, dan bagi yang membutuhkan polanya silahkan download yaa... Dan apabila ada yang sudah buat boleh upload hasilnya di Rajut Handmade

Dan kalo ada yang googling trus nyasar ke blog ini dan minat Vest ini bisa banget buat pesen, silahkan  SMS atau WA ke 085747726879 atau bisa lewat FB Rajut Handmade

Sumber pola : Yarnspirations

Read more »