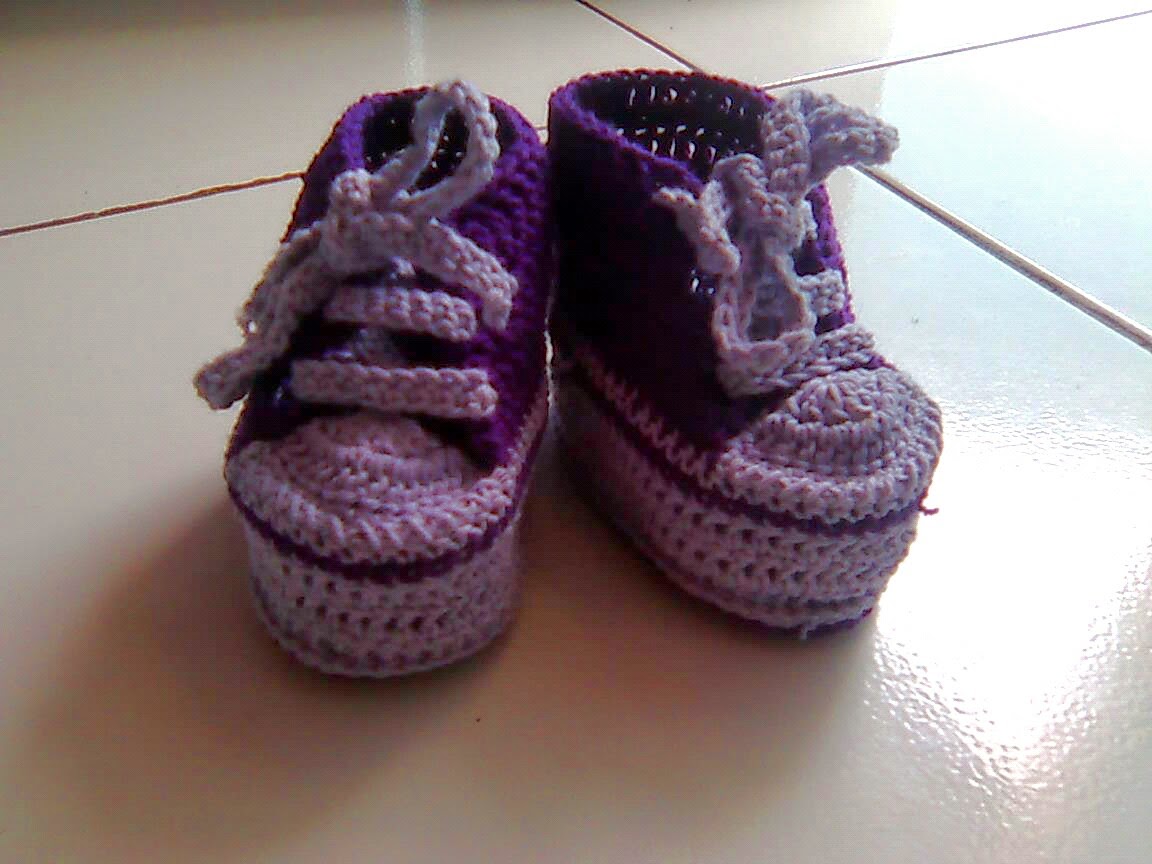
Share Pola : Tissue Box Cover Unik
Barusan browsing-browsing tentang pola tisue box ehh nemu pola yang unyu-unyu binti lucu, unik banget trus beda aja gitu. Berhubung lum ada waktu buat bikinnya share aja dulu patternnya disini yaa, kali aja nanti pas ada waktu senggang bisa bikin buat di rumah.
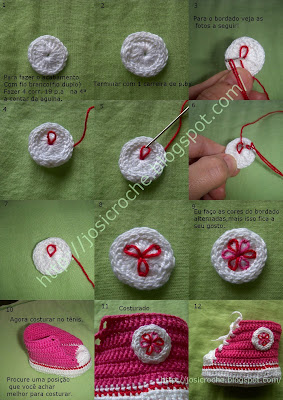
Mulai dari kotak tissue yang kecil persegi.
Pattern From : Tissue Box Bakery
Pattern
Mulai dari kotak tissue yang kecil persegi.
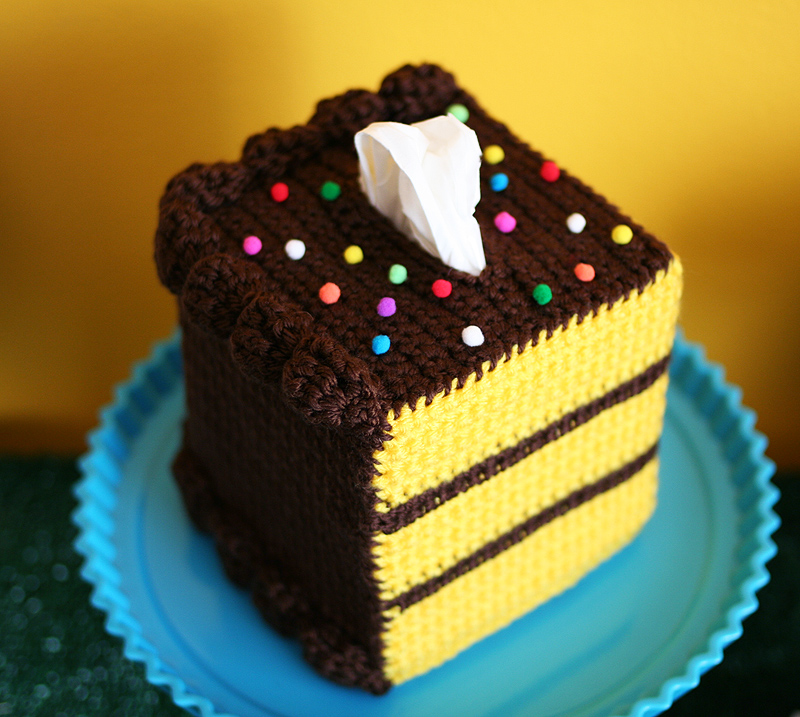
1. Kotak Tissue Chocolate Cake
Pattern From : Tissue Box Bakery
Pattern
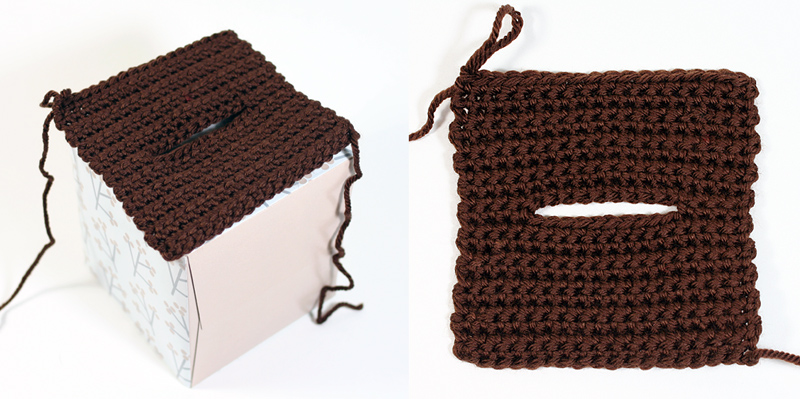
Abbreviationsch(s) =chain(s)rnd(s) = round(s)sc = single crochetsk = skipsl st =slip stitchst(s) =stitch(es)YO = yarn over( ) = work everything in the parentheses into the next stitch[ ] = repeat what is inside the brackets the number of times indicatedSpecial StitchesTall Bobble: I’m calling this a Tall Bobble because it uses a quadruple crochet stitch.YO3 times, insert hook into next stitch, YO and pull through 1 loop. [YO, pull through 2 loops] 3 times. You should have 2 loops on your hook.YO3 times, insert hook into same stitch, YO and pull through 1 loop. [YO, pull through 2 loops] 3 times. You should have 3 loops on your hook.YO3 times, insert hook into same stitch, YO and pull through 1 loop. [YO, pull through 2 loops] 3 times. You should have 4 loops on your hook. YO and pull through all loops.Chocolate Frosting (Top and Sides of Cozy)TopWith Chocolate, ch 19.Row 1: Sk 1st ch, 18 sc evenly across. (18)Rows 2-10: Ch 1, turn. Sc evenly across. (18)Row 11: Ch 1, turn. 4 sc, ch 10, sk 10 sts, and 4 sc, being careful not to twist your work. Your chs and sks create the hole for your tissue to come out. (18)Rows 12-20: Ch 1, turn. Sc evenly across. (18) Don’t break off.You should have a square, with a slit in the middle for the tissue, that fits on top of your tissue box. To work the two sides of your cake, you’ll be working in rows along the sides of your square.SidesRow 1: Without turning your work, ch 1 and work 20 sc (1 sc for each row along the Top). Then work 18 sc evenly along the next edge. (38)Rows 2-23: Ch 1, turn. Work 1 sc in each stitch. (38) Break off, leaving about a yard of yarn for sewing later. Weave in the other end.Cake LayersYou’ll be creating the next 2 sides of the cozy with 3 layers of yellow cake and 2 chocolate stripes.With Lemon, ch 39.Row 1: Sk 1st ch, work 38 sc evenly across. (38)Rows 2-6: Ch 1, turn. Work 38 sc evenly across. (38) Drop Lemon (no need to break off) and Join Chocolate.Rows 7-8: Ch 1, turn. Work 38 sc evenly across. (38) Break off Chocolate and pick up Lemon. You’ll see a little bit of the Lemon yarn traveling up the side of the rows, but you can hide this when you sew the whole cozy together.Rows 9-14: Ch 1, turn. Work 38 sc evenly across. (38) Drop Lemon (no need to break off) and Join Chocolate.Rows 15-16: Ch 1, turn. Work 38 sc evenly across. (38) Break off Chocolate and pick up Lemon.Rows 17-23: Ch 1, turn Work 38 sc evenly across. (38) Break off and weave in ends.* Fit the Cake Layers against your tissue box to see if it fits properly. I had to work one more row of Lemon to make mine fit properly. Sometimes, even if the math is perfect, the project still might need some tweaking. Don’t sweat it!Piped Frosting Trim (make 2)With Chocolate, ch 3.Row 1: Sk 1st ch, 2 sc evenly. (2)Row 2: Ch 5, turn. [Tall Bobble] 2 times. (2)Row 3: Ch 1, turn. 2 sc. (2)Repeat Rows 2 & 3 until you have enough Frosting Trim to fit around the top, chocolate frosted side of your Cozy. Be sure to complete a Row 3 before breaking off, leaving an arm’s length of yarn for sewing. For the top of this Cozy, I ended up working 8 rows of Tall Bobbles. 4 fit on each edge.The second Piped Frosting Trim will be for the bottom of the frosted side of your Cozy.Assembly1. Put Chocolate Frosting on your tissue box and pin Cake Layers to Chocolate Frosting. Sew the pieces together with the long yarn tail you left on Chocolate Frosting.2. Pin 1 Piped Frosting Trim along the top edge of your cake and pin the 2nd Piped Frosting Trim along the bottom. Sew these down with the long yarn tail you left. To preserve the puffiness of each Bobble, I usually stitch down the Trim (with two stitches) between the Bobbles and allow the yarn travel invisibly inside the cozy where there is a Tall Bobble.3. Glue on your rainbow sprinkles and enjoy!


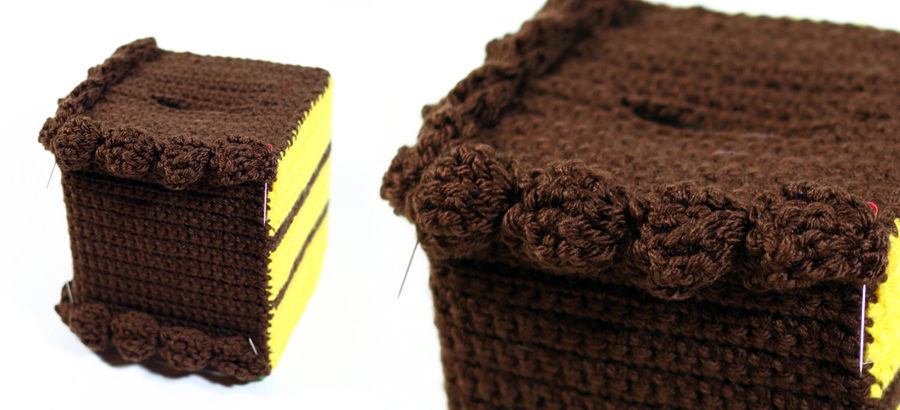
Note : Ukuran mungkin akan berbeda, tergantung benang dan jarum yang digunakan, jadi pastikan saat merajut untuk menyesuaikan lebar dari tisue yang akan di cover.
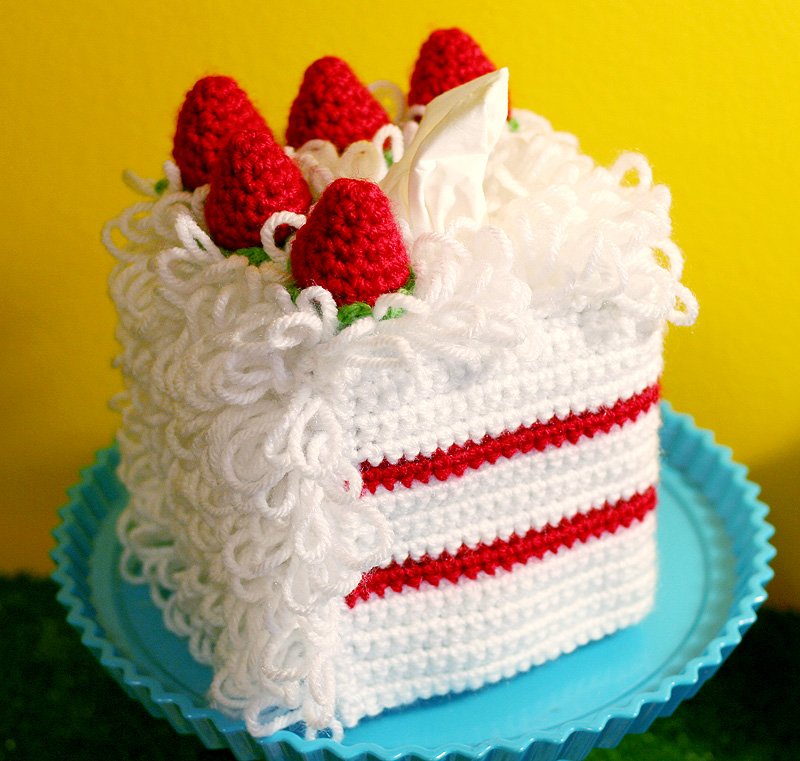
2. Kotak Tissue Strawberry Cake
Abbreviations
ch(s) =chain(s)
dec = decrease
lp st = loop stitch
sc = single crochet
sk = skip
sl st =slip stitch
st(s) =stitch(es)
YO = yarn over
( ) = work everything in the parentheses into the next stitch
[ ] = repeat what is inside the brackets the number of times indicated
Special Stitches
inv dec (invisible decrease): Insert hook into front loop of next st, then insert hook into front loop of following st, YO, pull through 2 loops. YO, pull through 2 loops.
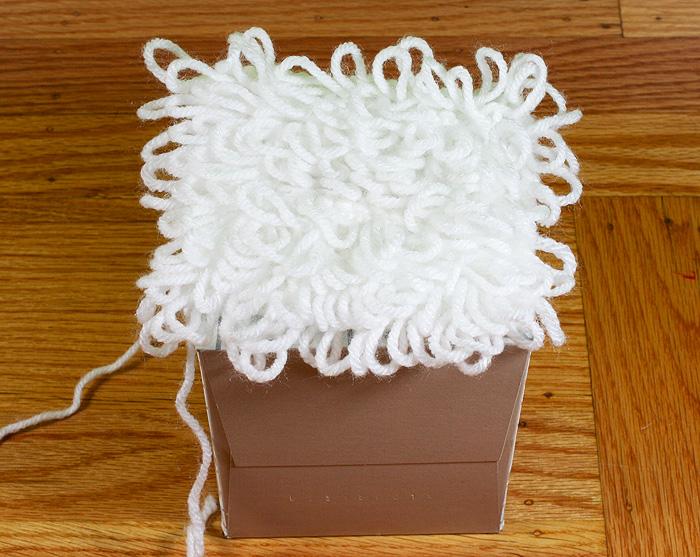
Loop Frosting (Top and Sides of Cozy)
(Pola Atas dan Samping)
Top
With White, ch 19.
Row 1 : Sk 1st ch, 18 sc evenly across. (18)
Rows 2 : Ch 1, turn. Lp st evenly across. (18)
Row 3 : Ch , turn. Sc evenly across. (18)
Rows 4-9 : Repeat Rows 2 and 3, three times. (18)
Row 10 : Ch 1, turn. 4 lp st, ch 10, sk 10 sts, and 4 lp st, being careful not to twist your chain. Your chs and sks create
the hole for your tissue to come out. (18)
Row 11 : Repeat Row 3. (18)
Rows 12-19: Repeat Rows 2 and 3, four times. (18) Don’t break off.
Anda harus membuat sebuah kotak dengan celah di tengah pada tissue box anda. Untuk mengerjakan 2 sisi samping dari kue anda , mulai baris dari 2 sisi samping bagian atas kue
Loop1
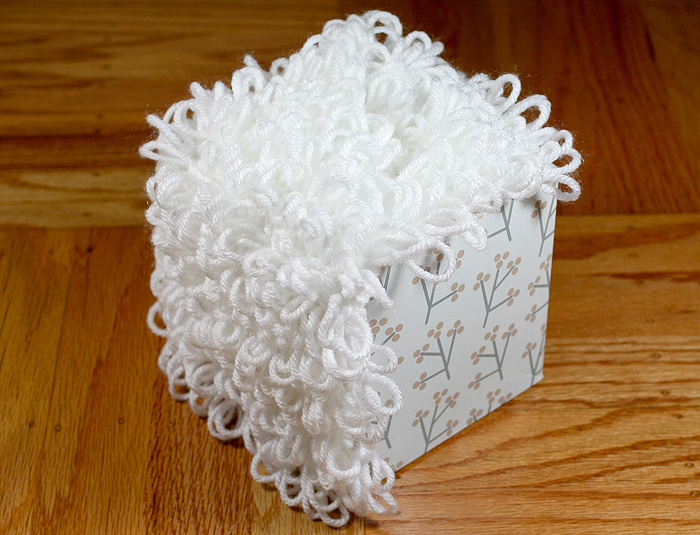
Sides
Row 1 : Ch 1, turn. Work 18 lp sts across. Then keep working along the edge of your square, 18 lp sts across. (36)
Row 2 : Ch 1, turn. Sc evenly across. (36)
Row 3 : Ch 1, turn. Lp st evenly across. (36)
Rows 4-23 : Ch 1, turn. Repeat Rows 2 and 3 ten times. (37) Break off, leaving about a yard of yarn for sewing later. Weave in the other end.
Loop2
Cake Layers
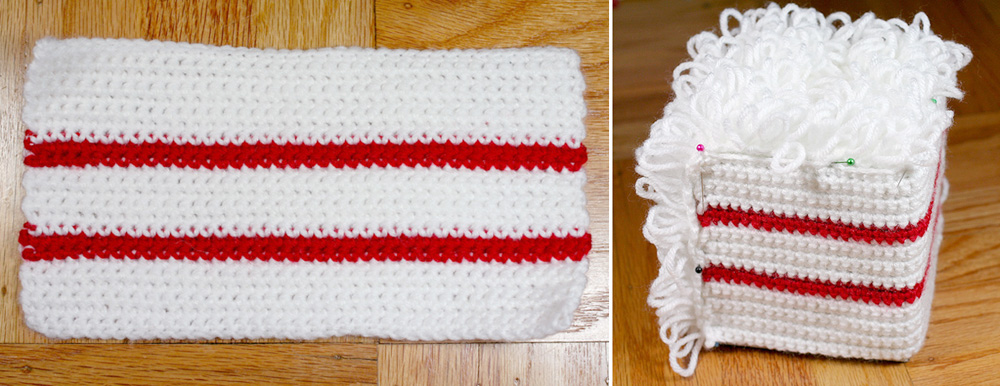
You’ll be creating the next 2 sides of the cozy with 3 layers of white cake and 2 strawberry stripes.
With White, ch 39.
Row 1 : Sk 1st ch, work 38 sc evenly across. (38)
Rows 2-6 : Ch 1, turn. Work 38 sc evenly across. (38) After Row 6, drop White (no need to break off) and join Scarlet.
Rows 7-8 : Ch 1, turn. Work 38 sc evenly across. (38) After Row 8, break off Scarlet and pick up White. You’ll see a little bit of the White yarn traveling up the side of the rows, but you can hide this when you sew the whole cozy together.
Rows 9-14: Ch 1, turn. Work 38 sc evenly across. (38) After Row 14, drop White (no need to break off) and join Scarlet.
Rows 15-16: Ch 1, turn. Work 38 sc evenly across. (38) After Row 16, break off Scarlet and pick up White.
Rows 17-23: Ch 1, turn Work 38 sc evenly across. (38) After Row 23, break off and weave in the ends.
* Fit the Cake Layers against your tissue box to see if it fits properly. I had to work one more row of White to make mine fit properly. Sometimes, even if the math is perfect, the project still might need some tweaking. Don’t sweat it!
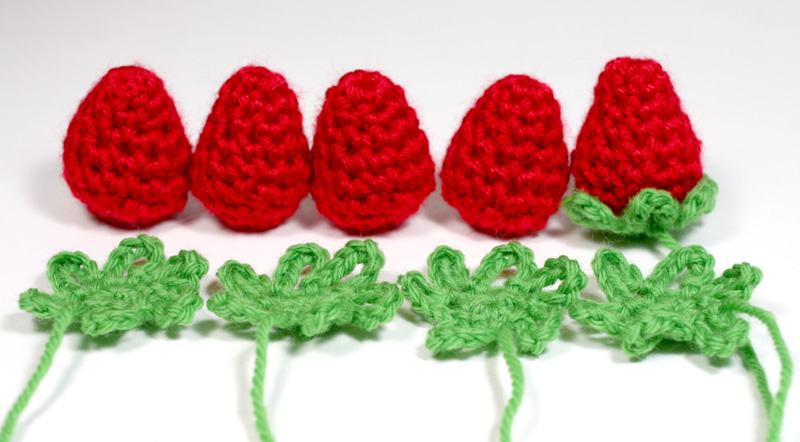
Strawberries (make 5) pattern also at Michaels.com
With Scarlet, make adjustable ring, or ch 3 and sl st to 1st ch to form ring.
Don’t join rounds. Right Side of work should show on outside of Strawberry.
Ch 1, 6 sc into ring (6)
[2 sc into next st, 3 sc evenly] Repeat 12 times until you have 18 sc.(18)
[inv dec, 1 sc] 6 times. (12)
Keep hook in your work, but break off leaving an arm’s length of yarn to continue crocheting with later. Use more red yarn from the skein to stuff Strawberry.
Continue to crochet. [inv dec] 6 times. Sl st to next st to join. (6)
Break off leaving approx. 8 inches of yarn. With tapestry needle, use yarn tail to close hole by weaving through remaining 6 sts. Break off and weave in end.
Strawberry Top (make 5)
With Chartreuse, make adjustable ring, or ch 3 and sl st to 1st ch to form ring.
Rnd 1: Ch 1, 6 sc into ring. Sl st to 1st ch to join. (6)
Rnd 2: [Ch 8, sl st into next st] 6 times. (6)
Break off leaving 18 inches of yarn for sewing later. Weave in beginning tail.
Tinggal jahit-menjahit dehh... gabungkan bagian atas dan samping yang sudah diberi pin tadi dan jahit juga strawberry di tempat yang diinginkan
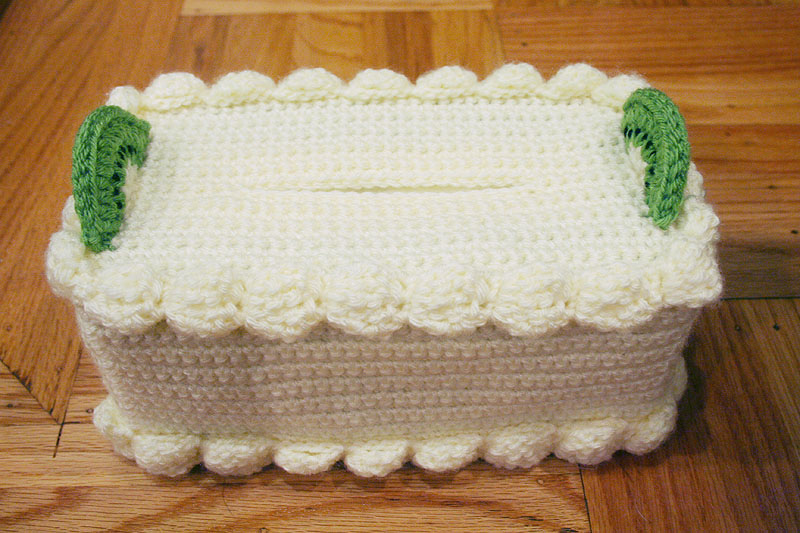
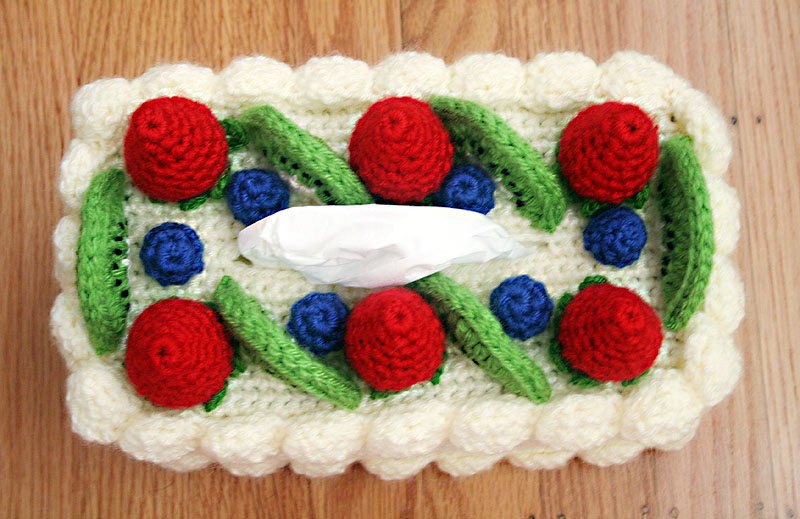
3. Kotak Tissue Fruit Topping
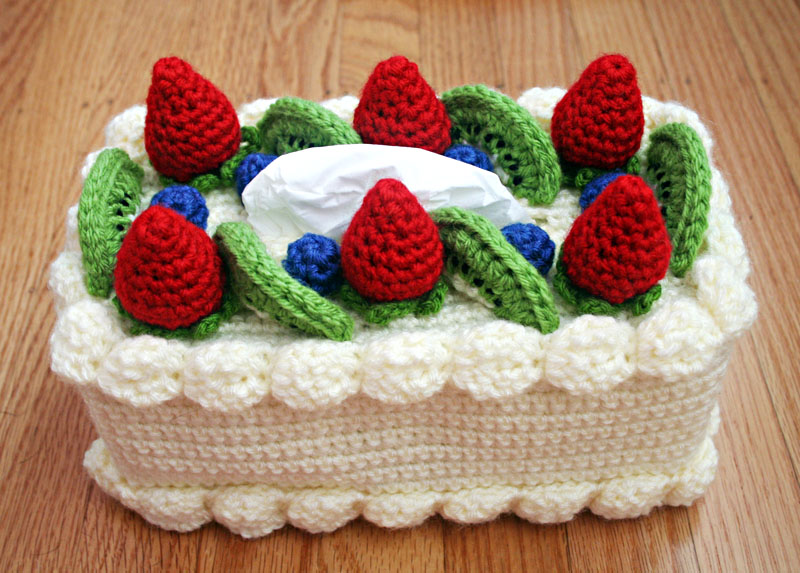
Hampir mirip dengan nomor 2 cuma ini buat kotak tissue yang lebih lebar
Pattern From : Twinkie Chan!
Pattern:
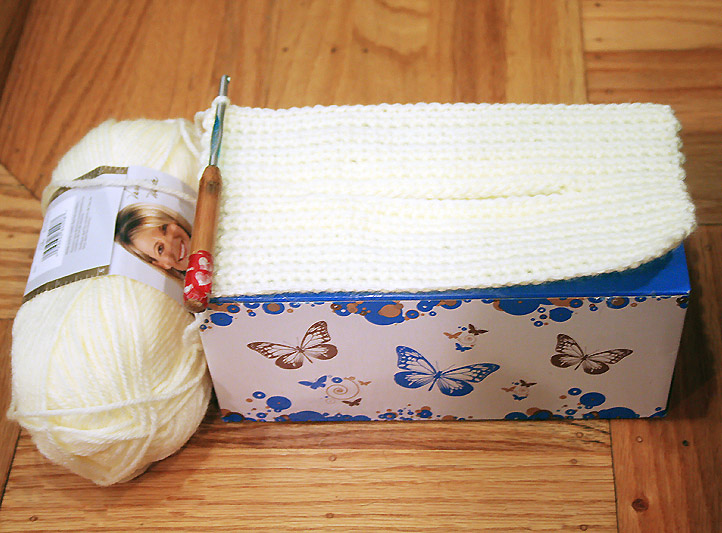
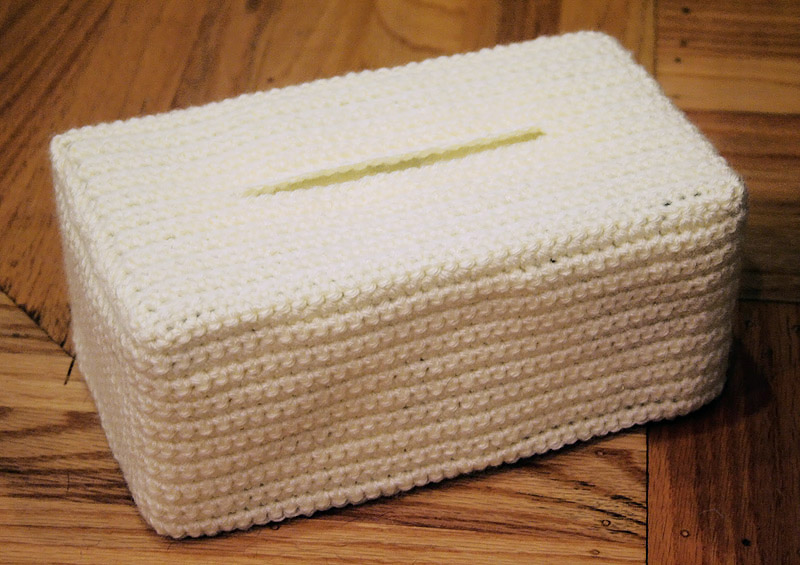
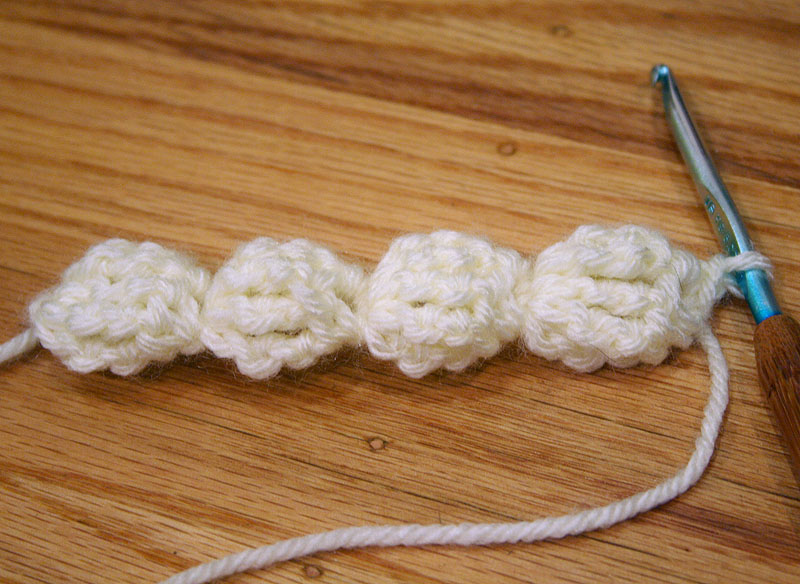
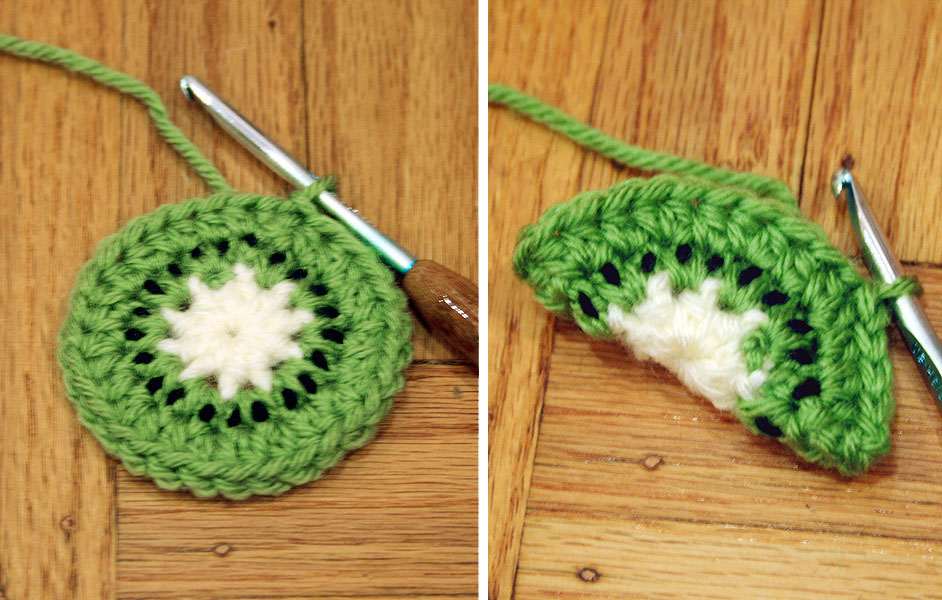
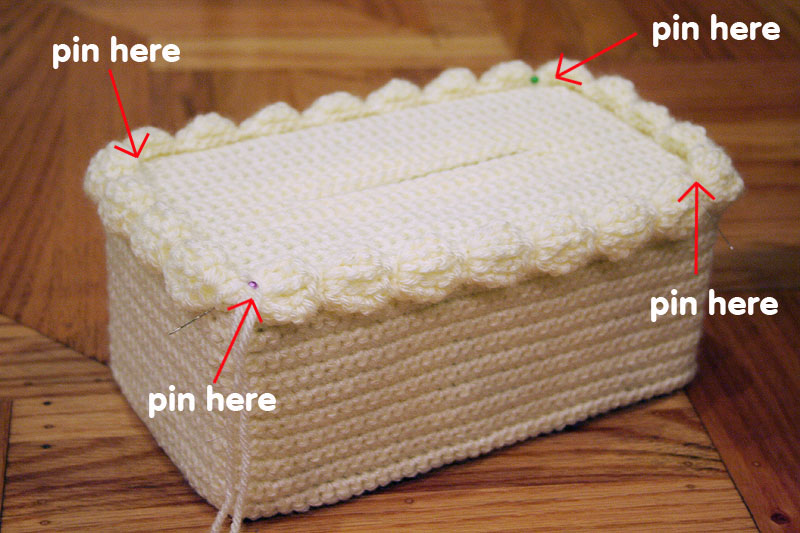
Abbreviationsch(s) = chain(s)hdc = half double crochetrnd(s) = round(s)sc = single crochetsc dec = single crochet decreasesk = skipsl st = slip stitchst(s) = stitch(es)YO = yarn over[ ] = repeat what is inside the brackets the number of times indicatedNotesKeep your tissue box close by, so you can check for good fit as you crochet. If your cozy ends up too big or too small, going down or up a hook size may help. For sizing the Cozy, the length of foundation chain corresponds to the length of the tissue box; the number of rows in the Cozy Top corresponds to the width of the tissue box; the number of rows in the Cozy Sides corresponds to the height of the tissue box. You can easily add or subtract to adjust to your tissue box size. The only semi-tricky thing to keep in mind is that the hole you create at the top for the tissue to come out should be centered.Special Stitches- Tall Bobble: I’m calling this a Tall Bobble because it uses a quadruple crochet stitch.YO 3 times, insert hook into next stitch, YO and pull through 1 loop. [YO, pull through 2 loops] 3 times. You should have 2 loops on your hook.YO 3 times, insert hook into same stitch, YO and pull through 1 loop. [YO, pull through 2 loops] 3 times. You should have 3 loops on your hook.YO 3 times, insert hook into same stitch, YO and pull through 1 loop. YO, pull through 2 loops] 3 times. You should have 4 loops on your hook. YO and pull through all loops.– sc dec: Single crochet decrease. In this pattern, work an “invisible decrease.” Insert hook into front loop of next stitch, then insert hook into front loop of stitch after that. You should have 3 loops on your hook. [YO, pull through 2 loops] 2 times.CozyCozy Top:With Lamb, ch 37.Row 1 : Sk 1st ch, 36 sc evenly across. (36)Rows 2-10 : Ch 1, turn. Sc evenly across. (36)Row 11 : Ch 1, turn. 8 sc, ch 20, sk 20, and 8 sc, being careful not to twist your work. Your chs and sks create the holefor your tissue to come out of. (36)Rows 12-21 : Ch 1, turn. Sc evenly across. (36) Don’t break off.– You should now have a rectangle, with a slit in the middle for the tissue, that fits on top of your tissue box.(Photo 1)– Now you’ll work around the rectangle to create the sides of the Cozy.Cozy Sides:Row 1 : Without turning your work, ch 1 and work 21 sc (1 sc for each Row along the short side of the rectangle). Then work36 sc evenly along the long edge. Work another 21 sc along the next short side. And then another 36 evenly alongthe last long edge. Sl st to 1st sc to join. (114)Rows 2-19: Ch 1, turn. Work 1 sc in each stitch. Sl st to 1st sc to join. (114)– Break off and weave in all ends.(Photo 2)Frosting Trim (make 2)With Lamb, ch 3.Row 1: Sk 1st ch, 2 sc. (2)Row 2: Ch 5, turn. [Tall Bobble] 2 times. (2)Row 3: Ch 1, turn. 2 sc. (2)– Repeat Rows 2 & 3 until you have enough Frosting Trim to fit all around the top of your Cozy. Check the length with the Cozy on your tissue box. Be sure to complete a Row 3 before breaking off, leaving an arm’s length of yarn for sewing. For the top of this Cozy, I ended up working 23 rows of Tall Bobbles.– In order for the 2nd Frosting Trim to fit around the bottom edge of the Cozy, you may need to work 1 or 2 more rows of Bobbles. Be sure to fit the Trim around your Cozy before breaking off and leaving an arm’s length of yarn for sewing. (See Photo 3 for a sample of 4 Tall Bobble rows.)Strawberry (make 6)With Scarlet, make adjustable ring, or ch 3 and sl st to 1st ch to form ring.Don’t join rounds. Right Side of work should show on outside of Strawberry.Step 1: Ch 1, 6 sc into ring (6)Step 2: [2 sc into next st, 3 sc evenly] Repeat 12 times until you have 18 sc. (18)Step 3: [Sc dec, 1 sc] 6 times. (12)Keep hook in your work, but break off leaving an arm’s length of yarn to continue crocheting with later. Use more red yarn from the skein to stuff Strawberry.Continue to crochet. [Sc dec] 6 times. Sl st to next st to join. (6)– Break off leaving approx. 8 inches of yarn. With tapestry needle, use yarn tail to close hole by weaving through remaining 6 sts. Break off and weave in end.Strawberry Top (make 6)With Kelly Green, make adjustable ring, or ch 3 and sl st to 1st ch to form ring.Rnd 1: Ch 1, 6 sc into ring. Sl st to 1st ch to join. (6)Rnd 2: [Ch 8, sl st into next st] 6 times. (6)– Break off leaving 18 inches of yarn for sewing later. Weave in beginning tail.Kiwi Slice (make 6)With Lamb, make adjustable ring, or ch 3 and sl st to 1st ch to form ring.Rnd 1: Ch 2, work 10 hdc into ring. Sl st to 1st hdc to join, dropping Lamb and joining Fern. (10)Rnd 2: Ch 2, work 2 hdc in each st. Sl st to 1st hdc to join. (20)Rnd 3: Ch 2, [2 hdc in next st, 1 hdc in next st] 10 times. Sl st to 1st hdc to join. Don’t break off yet. (30)– Cut approx. 1 yard of Black. With tapestry needle, stitch small seeds all the way around. I stitch in the top half of the hdc’s in Rnd 2. Only the Right Side of the Kiwi will show, so the back can look messy. Tie off and trim the ends on the Wrong Side, except the Fern you are still working.– Fold circle in half with Right Side on outside. Ch 1 with Fern and sl st the curved edge together through both layers to create a semi circular shape. Break off leaving 18 inches of yarn for sewing Kiwi Slice to Cozy later. (Photo 4)Blueberries (make 6 or more)With Colonial blue, unravel 12 inches of yarn. Make adjustable ring, or ch 3 and sl st to 1st ch to form ring. Don’t join rounds. Right Side of work should show on outside of Blueberry.Rnd 1: Ch 1, 6 sc into ring. (6)Rnd 2: [2 sc in next st, 1 sc in next st] 3 times. (9)Rnd 3: 1 sc in each st. (9)Rnd 4: [Sc dec, 1 sc] 2 times. Before opening gets too small, use beginning 12 inches of yarn to stuff Blueberry. Sc dec, 1 sc. Sl st to next st to join. (6)– Break off leaving 12 inches of yarn for sewing.– With tapestry needle, use yarn tail to weave through last 6 sts and pull tightly to close. Tie off but leave yarn tail for sewing Blueberry to Cozy later.Assembly1.With the Cozy on your tissue box, pin Frosting Trim to top edge of Cozy and then sew down. (Photo 5)
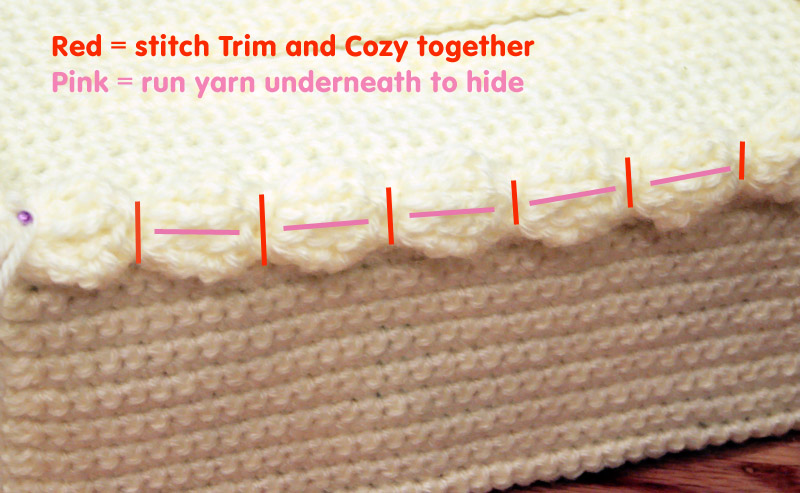
There’s no hard and fast rule for sewing, but here’s the method I used. I put a few stitches through the Cozy and the sc portions of the Trim, and then dipped my needle through the Trim and under the cozy, traveling the length of the Tall Bobbles to hide my yarn underneath both layers, and then I brought my needle back out in the next row of sc on my Trim, to work a few more stitches through Trim and Cozy. I repeated this for the entire length of Trim. (Photo 6)2. Pin 2nd Frosting Trim to bottom edge of Cozy and then sew down.3. Sew Strawberry Tops to all 6 Strawberries using Kelly Green yarn tail. Tie off but don’t break off, as you will be using the yarn tail to also sew Strawberries to Cozy later.4. To help with even spacing of the fruit, first sew down 1 Kiwi Slice to each short edge of the Cozy, using Fern yarn tail. (Photo 6) (At this point, you could also hot glue the fruit into place instead of sewing, but you’re cozy will become spot-clean-only unless you use fabric hot glue.)5. Using remainder of Kelly Green yarn tails, sew 1 Strawberry in each corner of the cozy. Then sew 1 Strawberry at each mid-point of the long edges.6. Using Fern yarn tails, sew remaining Kiwi Slices at an angle, in between Strawberries.7. Arrange Blueberries and use Colonial Blue yarn tails to sew onto Cozy.
4. Kotak Tisue Rumah

Spesial Stich:
- CC : Change Color
- Fpdc : Front Post Double Crochet [Tutorial]
- Bpsc : Back Post Single Crochet [Tutorial]
- Sk : Skip
Dinding rumah
Baris 1 : 132ch, slst pada ch pertama,2ch,131 sc slst.
Baris 2-8 : 3 ch, 131 dc. Matikan benang buat lekukan dengan melipat 3 dc jadi satu tiap 10 dc.
Baris 9 : 4 dc dec, 24 dc, 4 dc dec balik
Baris 10 : 3 ch, 2 dc dec,20 dc,3dc dec.balik
Baris 11 : 3 ch, 2 dc dec, 16 dc, 3 dc dec.balik
Baris 12 : 3 ch, 2 dc dec, 12 dc, 3 dc dec. balik
Baris 13 : 3 ch, 2 dc dec, 8 dc 3 dc dec. matikan benang
Baris 14 : dimulai dari ujung trapesium, sc sampai ujung satunya. matikan benang.
Alas Rumah
Baris 1 : 32 ch, dc pada ch ke 4 dari hakpen, 28 dc. balik
Baris 2-14 : 3 ch, 29 dc. balik
Baris 15 : (benang hijau) sc berkelilinh
Baris 16 : bpsc berkeliling
Baris 17 : ch, sc pada tempat yang sama,5 ch, sc pada ch baris 16) berikutnya, ulangi sampai berkeliling.
Untuk membuat motif rumput buat campura panjang (5 ch, 7ch,10 ch, dst... sesuai selera)
Atap Rumah ( Crocodile stich) buat 2x
Baris 1 : 46 ch
Baris 2 : dc pada ch ke 4 dari hakpen, [ 2 ch, 2 sk, dc, 2 ch, 2 sk, 2 dc inc (6x)]
Baris 3 : ch, 5 sc pada dc inc di baris 2, ch, 5 dc [sk 1 dc, 5 dc pada dc inc di baris 2, ch, 5 dc pada dc inc baris 2 (5x)] 5 dc, ch, 5 sc, slst di ch terakhir.
Baris 4 : 5 ch, 2 dc inc,[ 2 ch, dc, 2 ch, 2 dc inc (5x)], 2 ch, dc.
Baris 5 : 5 dc pada dc inc baris 4, ch, 5 dc (6x), slst pada ch ke 3 baris 4
Bris 6-13 : Ulangi baris 2-5 (4x) = 6 susun crocodile stich
Baris 14 : 2 ch, 42 sc. matikan benang.
Atap tengah
Baris 1 : 45 ch, dc pada ch ke 4 dari hakpen, 42 dc, balik
Baris 2 : 3 ch, 16 dc, 3 ch, 9 slst, 3 ch, 17 dc, balik
Baris 3 : 3 ch, 17 dc, 7 ch, 18 dc, balik
Baris 4 : 3 ch, 42 dc, matikan benang
Cerobong asap
Baris 1 : 26 ch, slst pada ch 1
Baris 2-3 : 2 ch, 25 hdc
Baris 4 : CC, ch, sc pada tempat yang sama, sc, 3 sc inc, 7 sc, 4 sc, 3 sc inc, 7 sc, 3 sc inc, 2 sc
Baris 5 : ch, 34 fpsc
Baris 6 : 3 ch, 34 fpdc
Baris 7 : ch, 34 fpdc
Pintu
Baris 1 : 12 ch, dc pada ch ke 4, 8 dc, balik
Baris 2-4 : 3 ch, 9 dc
Baris 5 : 5 tr pada ch ke 5 dan 6 dari hakpen
Baris 6 : CC, sc berkeliling
Jendela samping
Baris 1 : 9 ch, sc pada ch ke 2, 7 sc, balik
Baris 2-5 : ch, sc pada tempat yang sama, 7 sc
Baris 6 : CC, sc berkeliling.
Jendela depan
Baris 1 : 5 ch, sc pada ch ke 2, 3 sc
Baris 2-9 : ch, sc pada tempat yang sama, 3 sc, balik
Baris 10 : CC, sc berkeliling
Gabung atap rumah, atap tengah dan cerobong asap dengan dijahit tusuk jelujur.
Jahit salah satu sisi alas menempel ke dinding.
Jahit atap menempel ke dinding
Untuk menggabungkan alas dengan dinding di sisi lain, jahit kancing-kancing kecil sebagai aksen bunga dan lilitan rumput


 Download Ebook 100 Flower to Crochet and Knit