Share Karyaku : Baby Converse Crochet
Pagi semua... Proyek rajut apa yang dikerjakan weekend ini??
Rajut Handmade udah lama pengen share sepatu baby ini... walaupun udah banyak yang nulis di blog tentang pola ini...
Polanya termasuk gampang dan mudah dibuat. Walaupun hasilnya gak mirip sama yang ditiru.
Maklum masih belajar...
Polanya dapet dari blog luar yang pakebahasa [ga tau] dan untungnya ada pola bahasa inggris yang lebih mudah dimengerti..
Cek blognya di sini
Okk, buat yang gak mau repot klik blognya
Saya copaskan pola dan tutorialnya di sini
Stitches used:
chain (ch)
double crochet (dc)
single crochet (sc)
slip stitch (sl st / ss)
half double crochet (hdc)
Note: when said to “make 2 dc tog” it means “make them together in the same stitch”
*Pola sol sepatu* :
Start from the sole using white thread
1st row: 14 ch + 1 ch to turn. Then 7sc , 6hdc. In the last ch make 9hdc and turn. Go back on the other side of the ch, making 6hdc and 6 sc. In the last ch (where you made the first sc) make 4 sc. Fasten with sl st. Do not turn.
2nd row: work in circular rows. Ch3, 14 dc, *2dc tog, repeat from * 7 times; make 14 dc, 2dc tog, repeat * 2 times; sl st on ch3
3rd row: ch3, 14dc, (2dc tog, 1dc) 3 times; (2dc tog) 3 times; (1dc, 2dc tog) 3 times; 14 dc; (2dc) 6 times; sl st on ch3 (liat foto di bawah)
*Membuat sisi samping* :
4th row: Still using white thread, start making the sides, still circular rows. Ch3 and 1 dc on each stitch. Fasten with sl st.
5th and 6th rows: repeat 4th row. Fasten off
7th row: Using red thread make 1sc on each dc. Fasten off with sl st.
8th row: Using white thread, make 1sc on each sc. Fasten off with sl st.
After the 8th row: between the 3rd row (sole) and the 4th row (side) make a row of sc on each stitch, to make the sole well defined. Fasten off (liat foto di bawah)
Sisi [2]:
I do this way for the 9th row, starting from here (arrow pints the red pin)
9th row: use pink thread. See the picture to understand better. Fold the work lengthways. Leave 7 gaps between the sc and start 25 dc with pink thread. Since it is also divided on the other side, you’ll have 14 gaps in front (where you’ll make dc in white at a later stage) and 50 for the sides in pink. From now on, turn the work at the end of each row.
(on the picture in the middle): You’ll do the 14 dc here for the front of the shoe.
10th row: work back 50 sc (liat foto di bawah)
Sisi [3]:
top picture: beginning of 11th row.
Second picture: end of 11th row
11th row: at the end of 10th row, tunr your work, ch4 skip 2 sc below and make 1dc on each sc (46); ch 4, skip 2 sc below, sc. Turn, making 1sl st in each ch
12th row: 46 sc
13th row: work as 11th row (you’ll have 42 dc)
14th row: work as 12th row
15th row: work as 11th row (you’ll have 38 dc). ATTENTION: If you’re comparing this translation against the original text, you’ll see that Josi calls for 48 stitches, but if you look at the final picture here you’ll see that the in each row there’s a decrease of 4 stitches in each side, so here you have 38 dc)
16th row: work as 12th row
17th row: work as 11th row (you’ll have 34 dc). Do not work the sl st. Fasten off. You can make a few more rows if you want. (liat foto di bawah)
*Membuat lidah Sepatu*
1 – Front. Using white thread, ch 4, then 7 dc in the 4th ch from the hook. Ch3 and turn
2 – 2 dc tog in each dc (14 in total). Ch 2 and turn
3 – 1 sc in each dc then ch 1 and do 10 sc on the base of you semi-circle (as shown by the top pink arrow)
4 – After the 10sc, fasten off
5 – Using the pink thread, make 10 dc on the 10 sc in white. Repeat to a total of 7 rows and then 2 rows of 10 sc. Fasten off
6 – The front (tongue) is ready, now it just needs to be sewn to the shoes.
7, 8 and 9 – How to sew your shoes (just the white part) (liat foto di bawah)
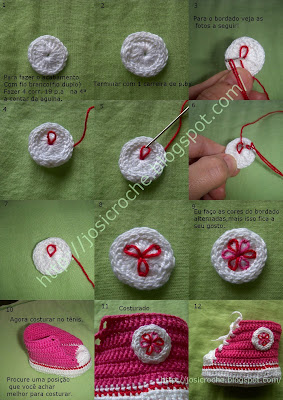
*Membuat Hiasan Bintang*
1 – Using white thread, ch 4 and make 19 dc on the 4th ch from the hook. Close with a sl st .
2 – Make 1 sc on each dc, close with a sl st and fasten off
3 to 9 – That’s how you make the “star”. You can use any colours you like.
10 – Sew it on the side, where you find it easier.
11 – Sewn.
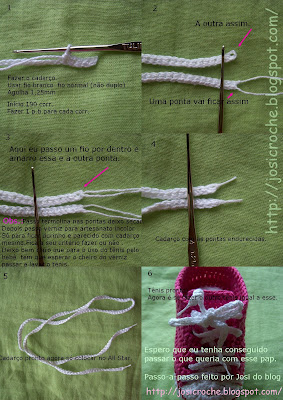
*Membuat Tali sepatu*
1 – Now the laces. Use white thread, single and 1.25 hook. Ch 190, ch1 turn and make 1 sc on each ch. Fasten off.
2 – One side has the turning chain and the other has the beginning and ending threads.
3 – Pass a small thread through the turning chain (pink arrow). Use varnish for crafts to make it stiff, like real laces. Remember to let it dry completely and wash the shoes before the first use!
4 to 6– Laces ready! Now just make the other one!
Rajut Handmade udah lama pengen share sepatu baby ini... walaupun udah banyak yang nulis di blog tentang pola ini...
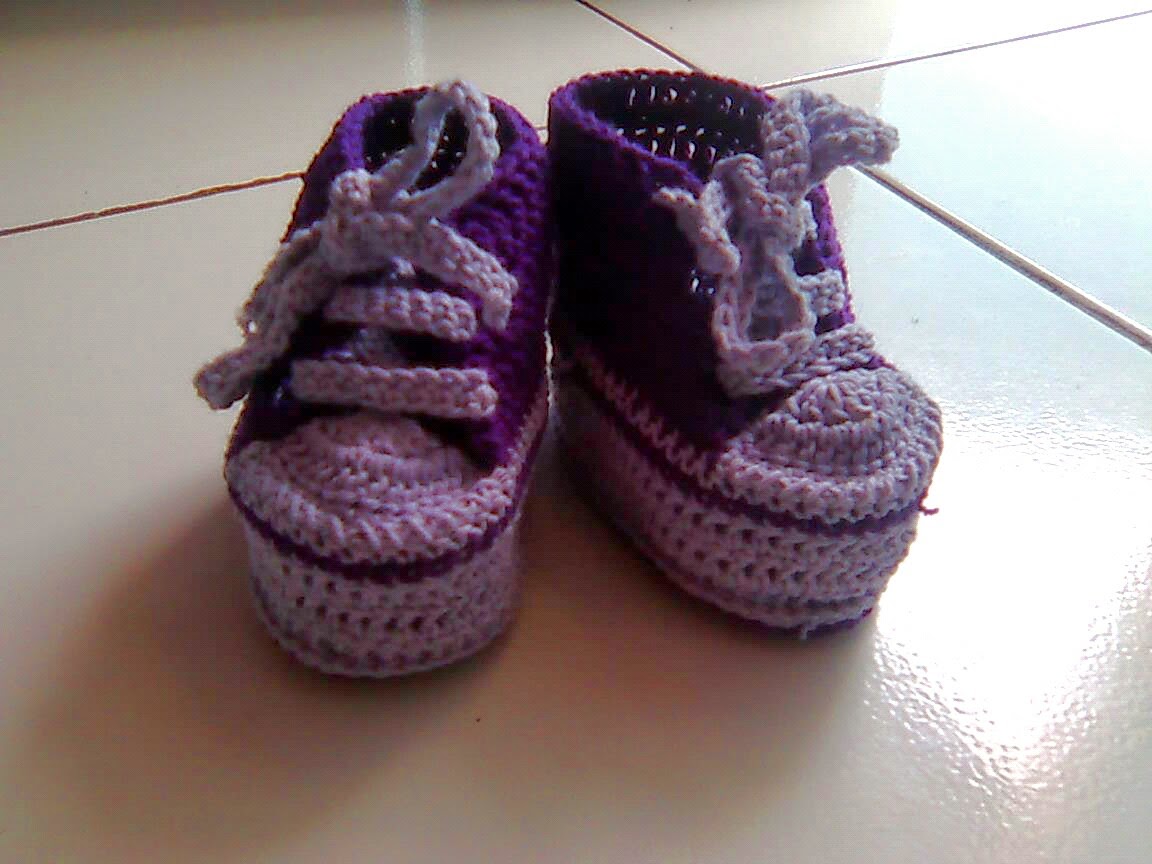 | |||
| Baby Converse Crochet |
Maklum masih belajar...
Polanya dapet dari blog luar yang pake
Cek blognya di sini
Okk, buat yang gak mau repot klik blognya
Saya copaskan pola dan tutorialnya di sini
Stitches used:
chain (ch)
double crochet (dc)
single crochet (sc)
slip stitch (sl st / ss)
half double crochet (hdc)
Note: when said to “make 2 dc tog” it means “make them together in the same stitch”
*Pola sol sepatu* :
Start from the sole using white thread
1st row: 14 ch + 1 ch to turn. Then 7sc , 6hdc. In the last ch make 9hdc and turn. Go back on the other side of the ch, making 6hdc and 6 sc. In the last ch (where you made the first sc) make 4 sc. Fasten with sl st. Do not turn.
2nd row: work in circular rows. Ch3, 14 dc, *2dc tog, repeat from * 7 times; make 14 dc, 2dc tog, repeat * 2 times; sl st on ch3
3rd row: ch3, 14dc, (2dc tog, 1dc) 3 times; (2dc tog) 3 times; (1dc, 2dc tog) 3 times; 14 dc; (2dc) 6 times; sl st on ch3 (liat foto di bawah)
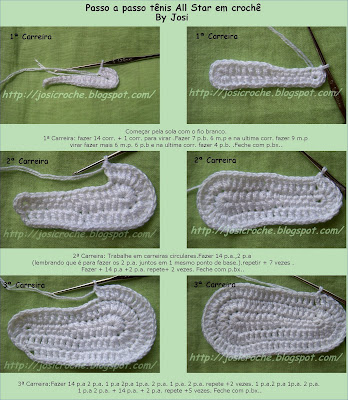 |
| Tutorial Sol Sepatu |
*Membuat sisi samping* :
4th row: Still using white thread, start making the sides, still circular rows. Ch3 and 1 dc on each stitch. Fasten with sl st.
5th and 6th rows: repeat 4th row. Fasten off
7th row: Using red thread make 1sc on each dc. Fasten off with sl st.
8th row: Using white thread, make 1sc on each sc. Fasten off with sl st.
After the 8th row: between the 3rd row (sole) and the 4th row (side) make a row of sc on each stitch, to make the sole well defined. Fasten off (liat foto di bawah)
 |
| Tutorial sisi sepatu [1] |
Sisi [2]:
I do this way for the 9th row, starting from here (arrow pints the red pin)
9th row: use pink thread. See the picture to understand better. Fold the work lengthways. Leave 7 gaps between the sc and start 25 dc with pink thread. Since it is also divided on the other side, you’ll have 14 gaps in front (where you’ll make dc in white at a later stage) and 50 for the sides in pink. From now on, turn the work at the end of each row.
(on the picture in the middle): You’ll do the 14 dc here for the front of the shoe.
10th row: work back 50 sc (liat foto di bawah)
 |
| Tutorial Sisi [2] |
Sisi [3]:
top picture: beginning of 11th row.
Second picture: end of 11th row
11th row: at the end of 10th row, tunr your work, ch4 skip 2 sc below and make 1dc on each sc (46); ch 4, skip 2 sc below, sc. Turn, making 1sl st in each ch
12th row: 46 sc
13th row: work as 11th row (you’ll have 42 dc)
14th row: work as 12th row
15th row: work as 11th row (you’ll have 38 dc). ATTENTION: If you’re comparing this translation against the original text, you’ll see that Josi calls for 48 stitches, but if you look at the final picture here you’ll see that the in each row there’s a decrease of 4 stitches in each side, so here you have 38 dc)
16th row: work as 12th row
17th row: work as 11th row (you’ll have 34 dc). Do not work the sl st. Fasten off. You can make a few more rows if you want. (liat foto di bawah)
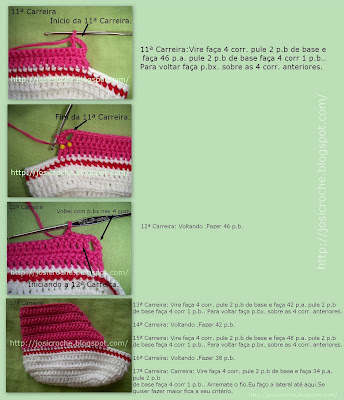 | |||||
| Tutorial sisi [3] |
*Membuat lidah Sepatu*
1 – Front. Using white thread, ch 4, then 7 dc in the 4th ch from the hook. Ch3 and turn
2 – 2 dc tog in each dc (14 in total). Ch 2 and turn
3 – 1 sc in each dc then ch 1 and do 10 sc on the base of you semi-circle (as shown by the top pink arrow)
4 – After the 10sc, fasten off
5 – Using the pink thread, make 10 dc on the 10 sc in white. Repeat to a total of 7 rows and then 2 rows of 10 sc. Fasten off
6 – The front (tongue) is ready, now it just needs to be sewn to the shoes.
7, 8 and 9 – How to sew your shoes (just the white part) (liat foto di bawah)
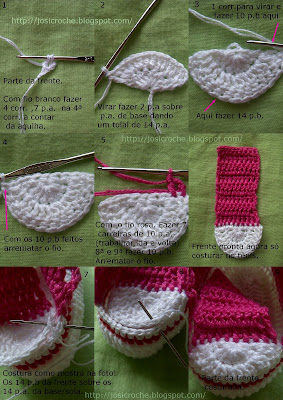 |
| Tutorial membuat lidah sepatu |
*Membuat Hiasan Bintang*
1 – Using white thread, ch 4 and make 19 dc on the 4th ch from the hook. Close with a sl st .
2 – Make 1 sc on each dc, close with a sl st and fasten off
3 to 9 – That’s how you make the “star”. You can use any colours you like.
10 – Sew it on the side, where you find it easier.
11 – Sewn.
 |
| Tutorial membuat bintang |
*Membuat Tali sepatu*
1 – Now the laces. Use white thread, single and 1.25 hook. Ch 190, ch1 turn and make 1 sc on each ch. Fasten off.
2 – One side has the turning chain and the other has the beginning and ending threads.
3 – Pass a small thread through the turning chain (pink arrow). Use varnish for crafts to make it stiff, like real laces. Remember to let it dry completely and wash the shoes before the first use!
4 to 6– Laces ready! Now just make the other one!
 | ||
| Tutorial Tali sepatu |
Selain pola diatas ada lagi pola sejenis yang bisa di download dalam bentuk file pdf yang udah Rajut Handmade simpan. Pernah nyobain polanya, lebih ribet, tapi lebih rapi hasilnya.Silahkan klik download untuk mengunduh polanya, dan membandingkan hasilnya.
Selamat berkarya.
Download Ebook Rajut Bayi [Klik]

1 komentar:
hasil akhirnya kira2 brp cm?
Posting Komentar
Thakyou for coming to my blog